Metadata Deluxe > Home
Adobe Bridge User Customizable Export-Import
This is a JavaScript extension for Adobe Bridge CS5 and higher that allows the user to export and import embedded XMP metadata from media files.
Supported file types: ai, avi, bmp, dng, flv, gif, indd, indt, jpe?g, mp2, mp3, mp4, mov, pdf, png, psd, swf, tiff?, wav, wma, wmv, xmp, and RAW files an XMP sidecar
This extension is written in Adobe ScriptUI and utilizes the Adobe Bridge XMP scripting API
Main features
- Export-import from select file(s) or from an entire folder (with option to include all subfolders)
- Export-import metadata in tab-delimited text files
- Define which fields to export-import
- Create reusable custom lists of fields
- Use established schemas (IPTC, Dublin Core, VRA) - either the entire schema or select fields
- Use custom schemas and namespaces
- Combine fields from different schemas
- Specify field name/column header (allows synchronization with local field names)
- Specify the order of the fields/column headers
This is a free open source project released under the MIT License
Before you begin
Backup your files first IT IS HIGHLY RECOMMENDED THAT YOU BACKUP YOUR IMAGE FILES BEFORE USING THIS OR ANY BRIDGE EXTENSION. THERE ARE NO WARRANTIES FOR LOSS OR UNINTENDED MODIFICATION OF DATA.
 version 1.0.5
Set Up and Exporting
Importing
Customizing Fields
Installation
- Start Adobe Bridge
-
Go to Bridge Preferences
Windows
- Go to Edit –> Preferences –> Startup Scripts
Mac:
- Go to Adobe Bridge –> Preferences –> Startup Scripts
- Click “Reveal My Startup Scripts”. This will open the correct folder
- In this folder, copy the the downloaded file “custom_export_import.jsx”
- Close the folder
- Quit Bridge
- Start Bridge
- When prompted, confirm the installation of “custom_export_import”
Open the plugin in Adobe Bridge
- Locate the menu “Metadata Deluxe” at the top of the Bridge window (to the right of “Help”)
- Click “Custom Metadata Export-Import” on the dropdown menu
- The first time you open the plugin, you have to set up the fields you want to export/import. You will see:
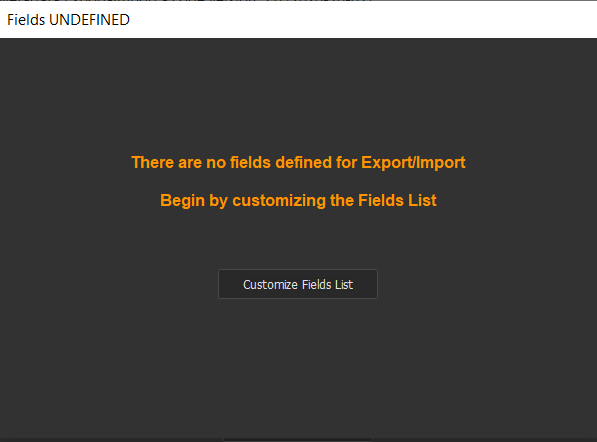
Click the “Customize Fields List” button to see the Customize Fields window.
Customize fields
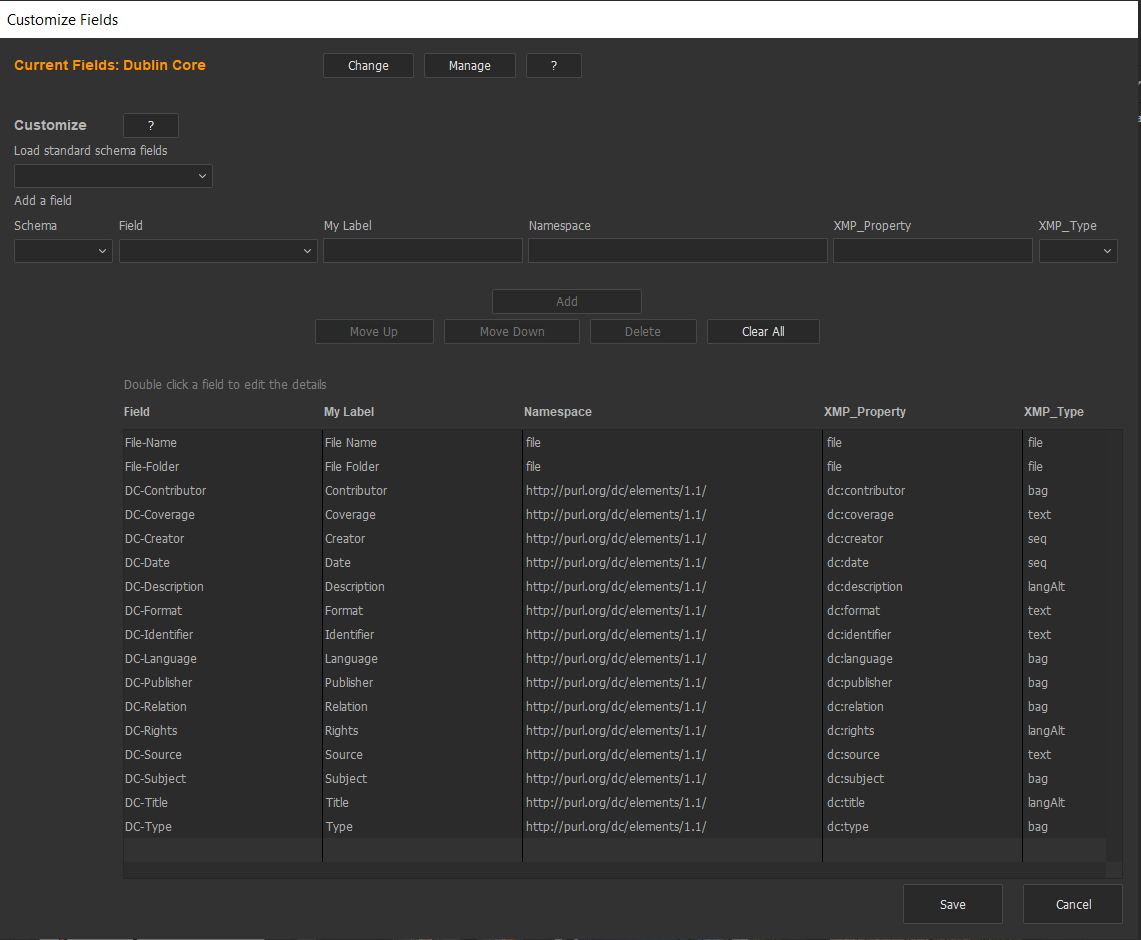
Current Fields Section
Orange text at top left is the name of the currently loaded field list
- ‘UNDEFINED’ means you have no list loaded, so you need to create one
Change button
- Select a previously saved mapping and it will be loaded (view the mapping below)
- Click Save to export/import using the mapping
- You can edit the loaded mapping and Save (you will be prompted to name it)
Manage button
- See all of your previously saved mapping files
- Mapping files are text files and can be deleted, copied, and edited
- Edit a mapping in a text editor
- Mapping must follow the same format: {Schema_Field:’IPTC-Creator’, Label:’Creator’, Namespace:’http://purl.org/dc/elements/1.1/’, XMP_Property:’dc:creator’, XMP_Type:’seq’},
Edit Fields Section
To load fields from a standard schema (File, IPTC Core, Dublin Core, VRA Core)
- Select a schema to add all its fields to your list
- You can edit your list after it loads
Add a field to your list
- Schema: select a schema
- Field: select a field from the schema
- Change the Label (optional)
- Click ‘Add’ to insert the field to the end of your list
- Click ‘Move Up’ or ‘Move Down’ to change the order of your field list
- To add a Custom schema field
- Select Schema: Custom
- Enter the Label (any label you want)
- Enter the Namespace (must be a URL ending in ‘#’ or ‘/’)
- Enter the XMP_Property (namespace prefix:name)
- Select the XMP_Type (‘text’, ‘bag’, ‘seq’, ‘langAlt’, ‘boolean’, ‘date’)
Edit your list
- Select a field
- Click ‘Move Up’ or ‘Move Down’ to change the order of your field list
- Click ‘Delete’ to remove a field from your list
- Save your list
Edit details of a field in your list
- Double click a field (an edit window will open)
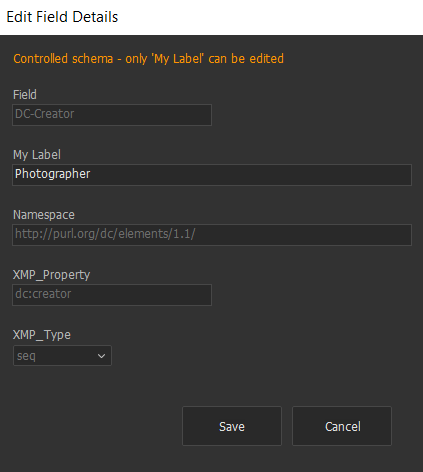
- Edit the Label (any label you want)
- For Custom fields only:
- Edit the Namespace (must be a URL ending in ‘#’ or ‘/’)
- Edit the XMP_Property (namespace prefix:name)
- Select the XMP_Type (‘text’, ‘bag’, ‘seq’, ‘langAlt’, ‘boolean’, ‘date’)
- Click ‘Save’
- Save your list
Custom mapping file details
Each field mapping is saved as a text (.txt) file
Each field in the mapping file is defined by a formatted text string containing the necessary elements to produce a valid XMP property.
Required Format
- {Field:’ ‘, Label:’ ‘, Namespace:’ ‘, XMP_Property:’ ‘, XMP_Type:’ ‘}, Required Format Definitions
- Field: Reference schema field label (supplied by this tool) or ‘Custom’
- Label: Your label for the field (call the field anything you like)
- Namespace: URL representing the schema (see schema specification or define your own for Custom). Must end in ‘/’ or ‘#’. Does not have to resolve to an actual web page.
- XMP_Property: namespace prefix : property name (see schema specification or define your own for Custom)
- XMP_Type: property type
- text = Plain text string (e.g., single character, word, phrase, sentence, or paragraph)
- bag = Unordered array of text strings (e.g., keywords in no particular order)
- seq = Ordered array of text strings (e.g., list of authors in order of importance)
- langAlt = Array of text strings in different languages using xml:lang qualifiers such as ‘en-us’. ‘x-default’ is used when the language is undefined.
- boolean = ‘True’ or ‘False’
- date = YYYY-MM-DD
Examples
- {Field:’File-Name’, Label:’File Name’, Namespace:’file’, XMP_Property:’file’, XMP_Type:’file’},
- {Field:’IPTC-Creator’, Label:’Creator’, Namespace:’http://purl.org/dc/elements/1.1/’, XMP_Property:’dc:creator’, XMP_Type:’seq’},
- {Field:’DC-Publisher’, Label:’Publisher’, Namespace:’http://purl.org/dc/elements/1.1/’, XMP_Property:’dc:publisher’, XMP_Type:’bag’},
- {Field:’VRA-Work Agent’, Label:’Work Agent’, Namespace:’http://www.vraweb.org/vracore/4.0/essential/’, XMP_Property:’vrae:work.agent’, XMP_Type:’text’},
- {Field:’My-Class’, Label:’Classification, Namespace:’http://www.myschema.net/’, XMP_Property:’my:class’, XMP_Type:’text’},
For more information on XMP properties, see the XMP Specification
- Select a field
- Click ‘Move Up’ or ‘Move Down’ to change the order of your field list
- Click ‘Delete’ to remove a field from your list Save your list
- Name your list
Export
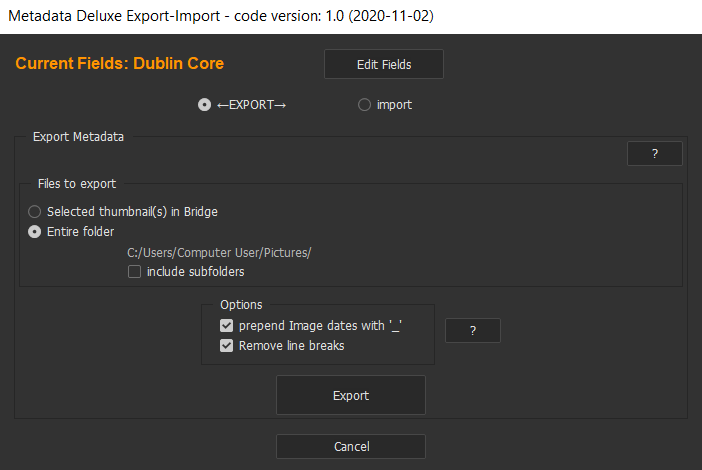
From selected files only
- Select file(s) in Adobe Bridge
- Under ‘Images’, choose ‘Selected thumbnails in Bridge’
- Select desired export options (see below)
- Click ‘Export’
- Choose name and location for your export file (.txt format)
- Save
From all image files in a folder
- Select ‘Entire folder’
- Use ‘browse’ to select folder you wish to use
- If you want to export images in all subfolders check the box ‘include subfolders’
- Select desired export options (see below)
- Click ‘Export’
- Choose name and location for your export file (.txt format)
- Save
After export is complete
- Open your .txt file in a spreadsheet using tab delimiters and UTF-8 character encoding.
- Under “File” menu i. Select file and click “Open” ii. Confirm settings: a) Tab-delimited (Excel) (.txt) if you will be using Excel Tab-delimited (Not Excel) (.csv) if you will be using OpenOffice or LibreOffice b) Delimited/Separated by = Tab iii. Click “OK”
- The first row will contain the field names
Export Options
Option 1: prepend Image dates with ‘_’
- This is useful if you will be importing the metadata to Excel.
- XMP Date values must use the YYYY/MM/DD format. Adding a ‘_’ character at the beginning of the Date will prevent Excel from automatically changing it to a format XMP cannot understand. (if your system is set up for another format, that will be reflected in the way Excel displays dates).
- The ‘_’ character will be removed when you import the data back into the image file(s).
Option 2: Remove line breaks
- This is useful if you will be importing the metadata to Excel.
- When selected, line breaks (line feed and carriage return) will be replaced by a semi-colon and a space (‘; ‘).
- When not selected, line breaks will be retained but converted to plain text place holders (‘LF’), (‘CR’) so that they are not changed by Excel. When the data is imported back to an image, the codes will be changed to the proper XMP encoding
Import
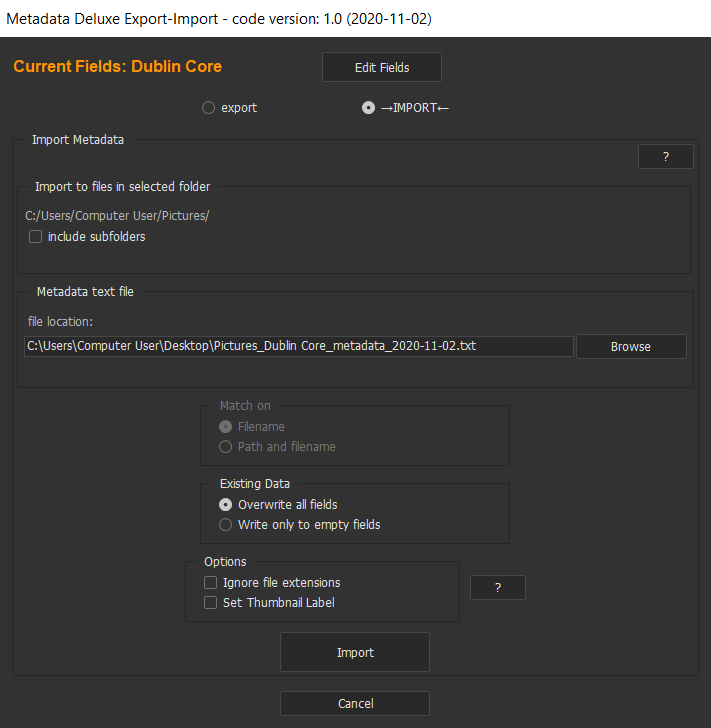
This script imports data from a tab delimited text file into image files with matching filenames. If you have already exported metadata and edited it in Excel and want to import it back in:
- Select the folder containing the target images a. If you have nested folders, check ‘include subfolders’
- Select the text file to be imported a. Click ‘Import’ and cross your fingers If you are starting with external metadata (from a database, etc.)
- First, you need a properly formatted template. Click the help (?) button on the panel under ‘Import’. This template lists all available IPTC fields and you can import data into any IPTC field.
Look for this new file on your desktop
- Open the text file in Excel
- Add data to the appropriate columns
- Save as a tab-delimited text file
To import data into image files:
- Select the folder containing the target images
- If you have nested folders, check ‘include subfolders’
- Select the text file to be imported
- Click ‘Import’ and cross your fingers
Import Options Option 1: Ignore file extensions When selected, metadata will be imported to all matching media with matching file names regardless of the file extension. This allows you to import matching metadata to all versions of the same media file, e.g., .tif, .jpg. .png.
Option 2: Create Title (IPTC Core) When selected, the Headline will be filled with the data values from: VRA Work Title, VRA Image Title
Option 3: Create Description/Caption (IPTC) When selected, the Description/Caption (dc:description) will be filled with the data values: Work Agent; VRA Work Title;_iTitle; VRA Work Date; VRA Work Type; VRA Work Material; VRA Work Measurements; VRA Work Location; VRA Work Id; VRA Work Rights
Option 4: Create Keywords (IPTC) When selected, Keywords (dc:subject) will be filled with the data values from VRA Work fields: VRA Work WorkType; VRA Work Technique; VRA Work Style/Period; VRA Work Culture; VRA Work Subject
Option 5: Set Thumbnail Label When selected, each image that has metadata successfully imported will have its label set to: ‘VRA metadata imported’ and the label color will be changed to white. Warning: Existing labels will be lost